Sorting through the blizzard of images generated by clickPanPro (cPP) I realise I need to organise my thinking about what makes a good KAP shot.
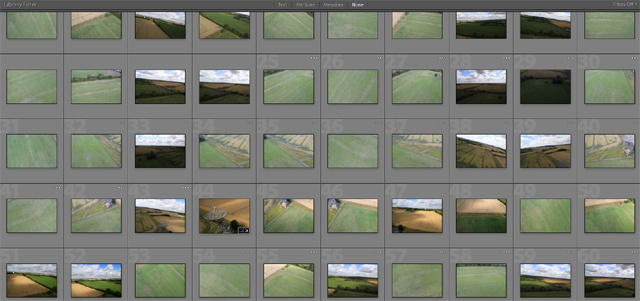
 A typical cPP sweep generates around 40 images (vertical , pan vertical, low oblique, high oblique, pan high oblique etc…) AutoKAP is all about sorting the wheat from the chaff.
There are lots of good ‘rules of thumb’ for photography but almost nothing succinct for kite aerial work. I realise these things are personal as KAP is a broad church with adherents to schools of thought varying from any image taken from a kite is a good one all the way up to George R Lawrence full plate or nothing thinking. There are probably as many ways of doing this as there are people doing it.
KAP is not a solely photographic enterprise; it encompasses flying load-lifting kites. Using a tethered aerial platform, as opposed to a fully mobile aircraft, the camera height, orientation and position are restricted and this has an impact on photography so my ‘rules’ extend beyond photography to the practicalities of handling a camera lifting kite.
Over the last 4 years I have begun to get an idea of what constitutes a good KAP outcome. I have got to the point where I set out to get an aerial image and return, either with an idea of how I might get a result in different conditions, or an image I feel justifies the method.
To date most of my kite photography has been with a directed camera and my adventures in AutoKAP are at an early stage. It must be said there is much joy to be had in accepting the random ‘surprise’ nature of automatic capture and a lot of really good KAP falls into the school of the ‘unexpected’ as chance, to a degree, governs the outcome. Lighting, location, camera state, and height are the photographer’s choice with AutoKAP, so despite the freedom of ‘fly and forget’ KAP, all rules apply except rule 6 which comes into play at post-capture processes like image selection, cropping and montage.
The first two rules are basic to photography and, in the age of the image stabilised, high ISO auto-focus camera, shouldn’t need to be said but often are forgotten in the excitement of flying the kite.
1. Be in sharp focus, do not accept motion blur.
Henri Cartier-Bresson famously said sharp focus is a bourgeois concept and my guess is he meant an ‘artistic’ concept which means ‘flexible’ in the eye of the artist. Personally I don’t hold with the idea. Long range image acquisition with a compact camera is compromised as it is: the smallest resolvable thing is often half a yard across, so why add to the weakness of the image by accepting blurred detail?
How can I make sure I get sharp focus when my camera is dangling from a kite line?
- Do not rely on the standard ‘Auto’ exposure setting.
- Use a fast shutter speed (1/200th or faster).
- Set a high ISO: 400 or 800 work well on newer cameras, auto settings don’t.
- Use a small aperture stop like f8 (tricky to judge, with a comapct camera avoid the widest apertures)
- Fit a Gyroservo on the tilt axis.
- Fly in the lightest wind possible.
- Shoot with a slack line.
‘Slack line’ is Simon Harbord’s term, back in the 1880s KAP pioneer Arthur Batut noted:
..one must, some seconds before the shutter release … walk in the direction of the wind with sufficient speed so that the kite has a tendency to come down. Under these conditions, it will recover the necessary stability to allow a successful photograph.
He spotted that if the camera has the forces acting on it in balance (i.e. not being tugged about by the kite line) its motion is nullified. Slack line can occur with wind variation, be achieved by paying out line, or as Batut describes, by walking toward the kite. The camera is niether rising or falling…it floats!
2. Shoot in good light.
Shooting aerials in poor light almost never works. I have seen some nice stuff shot over water where the upward reflected light can illuminate detail lit from an overcast sky but that’s it. No sun no fly. The world seen from above can look mighty flat if the lights are off. Direct sunlight also helps with rule 1; it keeps the shutter speed up. If there is broken cloud there is a good chance cloud shadow can add to the drama of the shot by dint of the high contrast possible. An anti-glare polarising filter is useless without strong light but it’s a boon when working with contrasty subjects. Sadly sunlight alone is not enough, the direction of the light is important. Shoot at midday and things look bleached, nothing can be seen in the shadows and trees in leaf look black; in short, direct overhead light is almost as bad as no light.
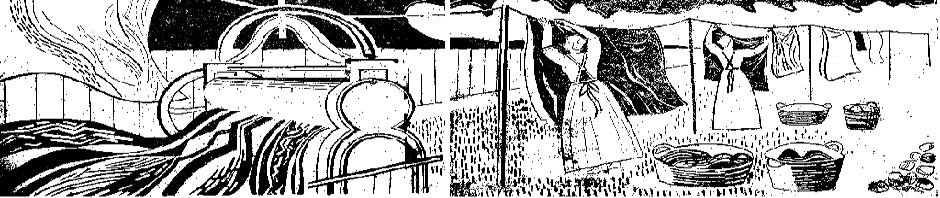
 On the left diffuse light on the right direct. Pick your dish.

Low angled sun cast at rightangles to the line of flight across the subject is ideal. Shooting into the sun can be effcetive but this is rare. ‘Wind out of sun’ is better lighting for subjects beneath the kite than than flying into the sun.
3. Do not risk injury to persons, livestock, property and overhead powerlines!
This rule is a strong contender as the only one I’d insist on in all cases. A kite in the sky is a wonderful thing. A line draped across a road with oncomming traffic or a kite snared in a powerline are not.
 Although not strictly a safety concern, permission can be an issue. Kite flying bans are almost universal at the growing number of nature conservancy sites. There is no point arguing about this when challenged, the threat to wildlife from a kite is largely a matter of opinion but the wildlife lobby in Britain are beyond reproach. It is surprisingly easy to blunder into risk because of the large area a kite can sweep and the desire to place the camera; I always have an ‘oh shit’ plan usually based on a quick tie off and a fast run down the line with a pulley to get the thing out of the sky. I wear a harness with clips for most common anchor points ready.

A sharp knife is a last resort I hope to never use but if a cutaway is needed to save life and limb it’s there.
Key points for safety:
- Make a careful weather assessment
- Know and respect the ‘rules of the air’ for kites
- Always have safety plan and the means to execute it
- Make a mental note of good upwind anchor points and overhead obstructions before you launch, remember kite flying makes you walk backwards into things.
- Use a kite & line that are known to be stable and in good order
- Brief persons involved…or likely to be involved
- Look behind you- that’s where the weather is coming from
- Don’t fly over motor traffic- you will be a distraction to drivers
- If in any doubt don’t fly: walk away.
All of which is easy to say but if you get in trouble it can take an age to get to a safe state. I was buzzed by a microlight the other day and I realised I was way over height. I had to get down from something like 150m to less than 60m and fast, the consequences of contact with my kite line did not bear imagining, the microlight was well below his 600m limit and I was above mine. A rapid descent needs a quick tie off and fast run down the line. On my belt I keep a 60 Kg dog collar:

(That’s the dog weight- a collar for a big dog) I can loop it around fence posts, tree boles etc. and clip it with one hand. Once I have a secure fastening I’m able to use a pulley and run down the line as quick as I can. I chose to run across wind so that the line would fall cleanly clear of trees once I’d taken in as much line as the field boundary would allow. I wound a turn over my (gloved) hand to haul back to the hitch post and repeat the operation till I was inside my safe height. It felt like ages but it took just 2 minutes to scrub off 100m of line.
 If it’s blustery I’ll take a dog stake with me, it gives me another option for a tie off point. In some ways a kite in a stiff breeze is like a dog, it needs a strong leash and is likely to dash off unexpectedly!
4. Match kite & line to wind & load.
This can be a very tricky thing to judge. More than anything else this is the trick to master if this is going to work.
The benefits of keeping a selection of kites as well as 2 spools of line and 2 rigs of different weights to hand are:
- Kite choice: pick the right kite for the wind. A given wind-speed will support a given load with a given kite. The basic rule is: the stronger the wind the smaller the kite and lighter the wind the bigger the kite.
- Kite size: small kites are very sensitive to line weight, even in a tugging breeze a small kite will often do better on a light line. There is less drag on the line and the reduction in weight will let it fly steeper.
- A heavy line can get a kite to fly further down wind at a shallower angle if you need to.
- AutoKAP rigs tend to be lighter than a full RC rig and will stay up longer if the wind is weak.
- Test the lift by getting the kite up, stable and into clean air before expecting it to lift the camera.
 The closest thing I have found yet to a ‘jack of all trades’ KAP kite is the ITW 9′ Levitation delta. (much thanks to Ramon ‘Kappix’ Palares for the info) When correctly sparred it can cope with Bft 2 (with a very light rig) to Bft4 (1.5 kg rig no problem) without ripping your arm off and is stable throughout its wind range.

In theory it’s possible to lift any weight with a big enough kite provided the wind will allow it. In practice the tackle and space needed to handle a train of kites can seriously limit where you can place the camera. If you want to be able to walk with the kite, it can be a delicate balancing act to keep the rig aloft with just enough lift. This is where the wind range of the kite becomes critical. A kite with a wide wind range is better for KAP than one which will only fly smoothly at a specific wind speed. All kites have their limits and you must know what they are and how they react when overblown. Some give plenty of warning, others don’t.
5. The level horizon shall be level.
There is no need to take photos that look like the view from the cockpit of a crashing plane. It’s unsettling. Painful. One of the great gifts of KAP is the aerial perspective view but this is ruined by a tilting horizon. It is particularly distressing if the sea forms the horizon: that’s a level line. Has to be, it’s the most level thing there is. There are occasions when a tilted view can add drama or a lucky swing of the camera fits the whole subject in but they are few. A tilted horizon is a record of how poorly the rig is performing. Who, honestly, wants to look at this?

6. The subject shall not be clipped by the frame, trees, poles, wires and shadow etc.
Obvious really, I want my subject to sit centre frame and be clearly visible, but I’m amazed how often the thing I’m trying to photograph hides behind all manner of obstructions. The rule of 3rds applies (not the ‘1 third of the shots will have bits of the subject in, 1 third will miss it altogether and 1 third will be wrecked by motion blur’ rule that applies to a lot of KAP). The basics of visual communication determine what should be in the photo and how it should be framed; of course the behavior of the kite has other ideas!
There are times (AutoKAP times) when an abstract arrangement of familiar forms can be nicely diced by the frame edge, the random patterns of geometry KAP can throw at you can be very pleasing indeed:

Rule 6 then is less of a commandment than an ‘guideline’, it’s a matter of choice; I don’t want to clip my subject unless I think that’s what the subject needs given the height I can work at.
Below is a typical KAP framing sequence, the camera position is at the mercy of the wind a lot of the time, the physics of turbulence, drag, lift and suspended mass don’t make this easy:

 A decision to fit a whole building into a single shot can require a big stand off, if the height limit will allow it:
 KAP far too often forces the clip and that’s what rule 6 is about: KAP shouldn’t clip the subject unless clipping the subject creates the effect I, as a photographer, want to achieve.
7. The height shall be appropriate to the subject
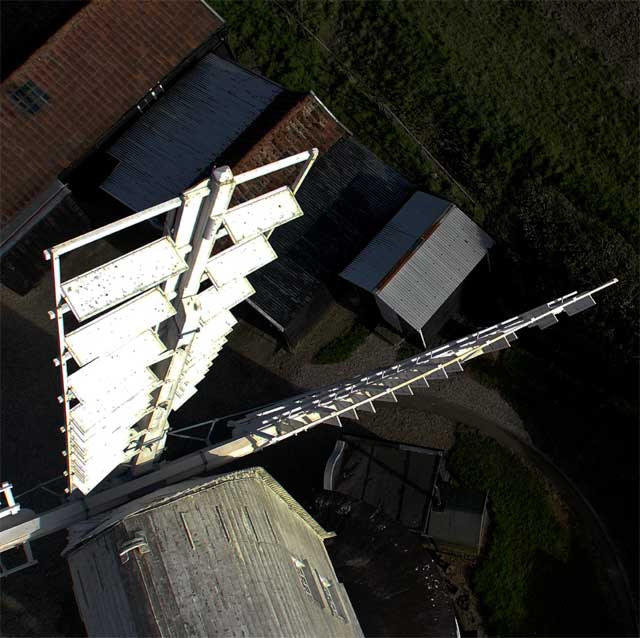
There is no point trying to take photos of people you know from 60m away: you won’t recognise them. Most things look better photographed up close so flinging a camera into the sky is counter to the commonly quoted photographic rule that ‘there is no substitute for proximity’. The beauty of KAP is that it works at an unusual height to relate to. There few moments when most of us experience the view from 60m up, the immediate view at take off and just before the bump when we land, the view from a roof or cliff top. These are often uncomfortable places and yet KAP gives us a viewpoint from just that height. The sense of height is amplified by objects seen close up from a near vertical viewpoint:

Sheer height alone may not give a dramatic new view of a wide landscape, a steeply tilted view of detail at a lower height may well have more impact. The kite will give you the privilege of height but it should be used wisely. The nadir (vertical) view lends an abstraction to the everyday provided its not so high as make objects indisinct:

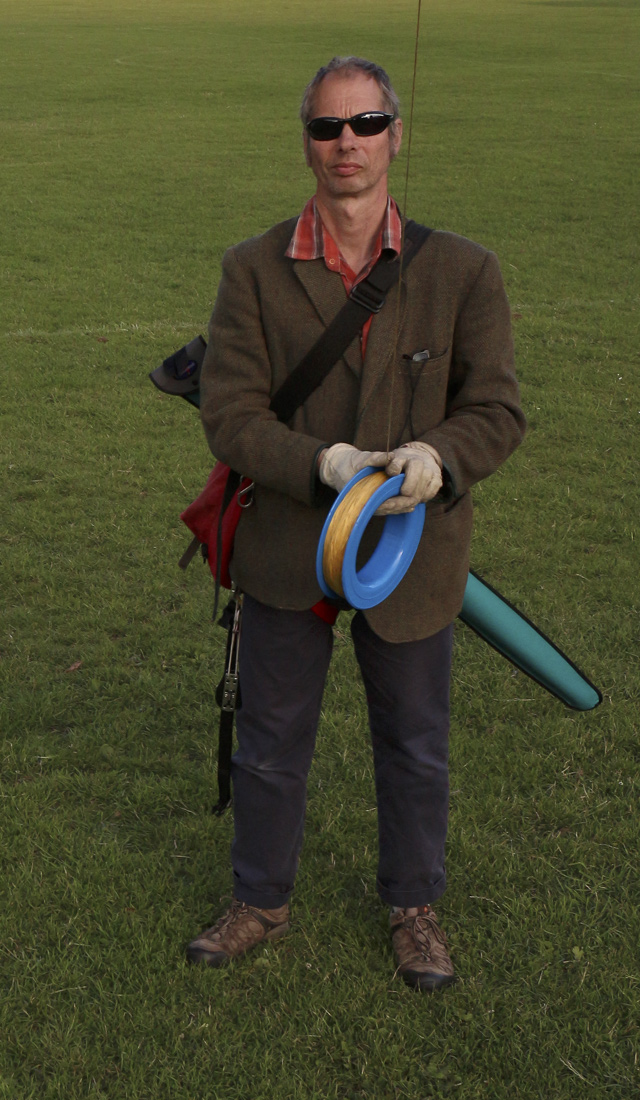
8. Wear gloves.
If you take no other safety gear than a pair of gloves you will avoid the most common kite flying injuries. It’s worth shelling out for a decent pair. Yes they will get cut up but good ones last longer then cheap ones.
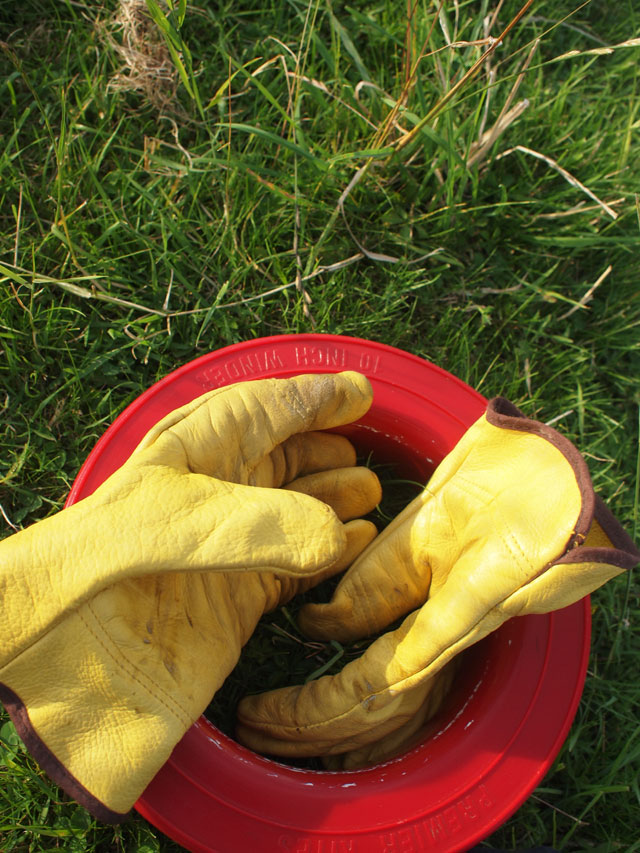 Gloves give you grip and this allows kite control. High tensile line is slippery by design (to minimise air and ‘wrap’ resistance) it’s almost impossible to handle with bare hands. Fingers are precious; spares are very hard to find. It’s worth being dressed for the weather too, at the slightest exposure to the harmful rays of the sun I burn like bacon under the grill so a hat in the sun is a must for me…and sunglasses as I spend a lot of time staring into a bright sky ( see rule 2).
9. Do not include the KAPer, his car, bike or kit.
Leaving the car where it will be in shot shows a lack of foresight as does festooning the subject with a random litter of un-spooled line, failed kites, unpacked rig boxes and the like. It’s avoidable so it should be avoided.

It would have been easy to park the car under the tree wouldn’t it?
10. The image shall be of the best resolution possible. No GoPro for me!
Taking pictures from a long way off needs 2 things: a long focal length and a big negative. Using a kite to lift the camera requires the thing to be as light as possible. Fortunately my ceiling is 200′ not 50,000 so a 72 g ‘high definition’ camera would surely be ideal?
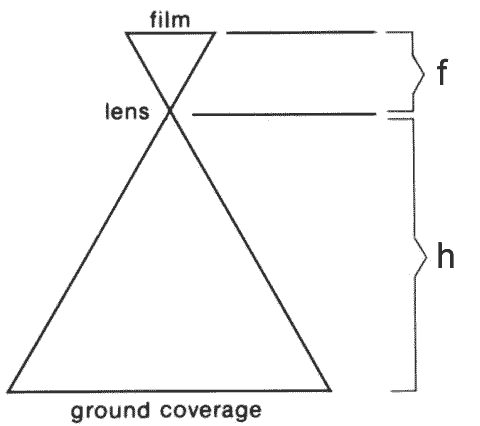 Remember this? Photoscale= h/f. With the GoPro f= 11mm and h is typically 60000 which gives an approximate photoscale of 1: 5000. Use a 35mm lens and you get roughly 1:2000 that’s better than double the resolution. That’s only half the story, the sensor size and its pixel count come into play too: the bigger the sensor the better its optical performance and the better the resolvable detail on the image.
Now I know a lot of kite flyers love the GoPro so a rule against use of the 72gram marvel might seem a bit odd. The problem is it’s a low resolution video camera. It doesn’t capture detail at all well. This is for 2 reasons:
- Sensor size: at 7mmx11mm the GoPro ‘Hero’ does amazingly well but the images are characteristically grainy in shadow and the wide stop/ low light capture is compromised because of this.
- Lens configuration. The lens design is all about placing the camera wearer ( they call it the ‘Hero’ for a reason) at the centre of the action. A very wide lens is used to do this. A fish eye. I do not see the world through the eyes of a fish. If the spherical projection is corrected to a perspective one (a more human view) more than 2 /3rds of the image is wrecked by pixel stretch and moiré effects.
 A de-fished GoPro image reveals the appalling waste of pixels outside the centre third.

You can record many things with it but it will not, unless you are very close to the subject, take good resolution aerial stills.
 Why rules?

The idea of a simple set of rules for something as erratic as photography from a kite might seem a bit silly but it’s one way of making a safe way of working memorable. I have learned a great deal from the online postings of Simom Harbord, Chris Benton, Christian Becot, Brooks Leffler and many others so I imagine I’m re-living much of their experience but with the benefit of avoiding some of the more painful lessons they have been so generous in sharing. Rules seem negative so I think it’s important to make it a rule that this should be fun! Getting a good KAP shot can be a challenge and getting a kite to fly can be frustrating but knowing the joy of kite, camera and flier in balance makes this human keep coming back for more of it; I never tire of seeing the world from on high….you just have to wait for the wind!
If you are interested in KAP there are far better ‘rules’ to be gleaned from the examples to be found these pages:
B


Very well done. A great top ten and a great link for beginners.
Well done, Bill! Are these requirements are only for professionals? ;o)
Piotr
Jeff, Piotr,
Amateur or professional; it’s a learning process how ever you look at it. Kites are daughters of the wind and we can never really know what they will show us next!…
Is there such a thing as a professional KAP? What should be the criteria? Good pictures, or good use of the a kite? It’s probably a good topic? :O)
Piotr
Pingback: clickPanPro refined: path A | Billboyheritagesurvey's Blog